

Last Updated on August 2, 2026 by Eric B. Steele
Have you ever wished you could carry a backpack that fits you perfectly and shows off your style? Making your own backpack is easier than you think, and it gives you full control over the design, size, and materials.
Imagine having a bag that’s truly yours—made with your hands and ready to go wherever you do. In this guide, you’ll discover simple steps and insider tips to create a backpack that matches your needs. Ready to turn your idea into reality?
Let’s get started!
Choosing Materials
Making your own backpack starts with picking the right materials. Good materials make the backpack strong and long-lasting.
Think about the fabric, hardware, and tools you will need before you begin sewing.
Fabric Types
Choose fabric that fits the backpack’s use. Heavy fabrics work well for hiking bags. Lightweight fabrics are good for daily use.
- Canvas: Durable and water-resistant
- Nylon: Lightweight and strong
- Polyester: Easy to clean and dries fast
- Cordura: Very tough and abrasion-resistant
- Leather: Stylish but heavier and less water-friendly
Hardware And Accessories
Hardware parts keep your backpack functional. Choose pieces that match the fabric strength.
| Hardware | Purpose | Material |
| Zippers | Close pockets and compartments | Metal or plastic |
| Buckles | Secure straps and closures | Plastic or metal |
| Strap adjusters | Change strap length | Plastic or metal |
| Rivets | Reinforce stress points | Metal |
| Thread | Hold everything together | Heavy-duty polyester or nylon |
Tools Needed
Having the right tools makes sewing easier and the backpack stronger. Gather all tools before you start.
- Heavy-duty sewing machine
- Sharp fabric scissors
- Measuring tape or ruler
- Seam ripper for fixing mistakes
- Chalk or fabric marker for drawing patterns
- Pins or clips to hold fabric pieces
- Needles suitable for thick fabric
Credit: www.customink.com
Designing Your Backpack
Making your own backpack is fun and creative. You can choose the style and features you like.
Designing your backpack involves planning and creativity. Let’s explore how to get started.
Sketching The Layout
Start by drawing a simple sketch of your backpack. This helps you visualize the design.
Think about the shape and size you want. Will it be for school, travel, or hiking?
- Draw the front view with zippers and pockets.
- Sketch the side view to see the depth.
- Include any special features like straps or handles.
Measuring And Sizing
Decide on the size of your backpack. Use a measuring tape to get accurate dimensions.
Consider who will use the backpack. A child’s backpack is smaller than an adult’s.
- Measure width, height, and depth for the main compartment.
- Check the length of straps for comfort.
- Ensure it fits the items you plan to carry.
Planning Pockets And Compartments
Pockets keep things organized. Plan how many you need and where to place them.
Think about what you will carry. This helps in deciding pocket size and type.
| Main Compartment | Books, laptop |
| Front Pocket | Keys, phone |
| Side Pockets | Water bottle, snacks |
Cutting And Sewing
Making your own backpack starts with cutting and sewing fabric pieces. Careful cutting and sewing help create a strong bag.
Follow simple steps to prepare fabric, use basic stitches, and assemble the backpack neatly.
Preparing Fabric Pieces
Start by choosing durable fabric like canvas or denim. Wash and iron the fabric before cutting to avoid shrinkage later.
Use a ruler and fabric chalk to mark the shapes for the front, back, sides, bottom, and straps. Cut each piece carefully along the lines.
- Front and back panels
- Side panels
- Bottom piece
- Straps and handles
- Optional pockets
Basic Sewing Techniques
Use a sewing machine or needle and thread to join fabric pieces. Start with simple straight stitches to connect edges.
Double-stitch areas that will hold weight, such as straps and bottom corners, for extra strength. Keep stitches even and tight.
- Straight stitch for seams
- Backstitch to secure ends
- Zigzag stitch to prevent fraying
- Topstitch for a clean finish
Assembling The Bag
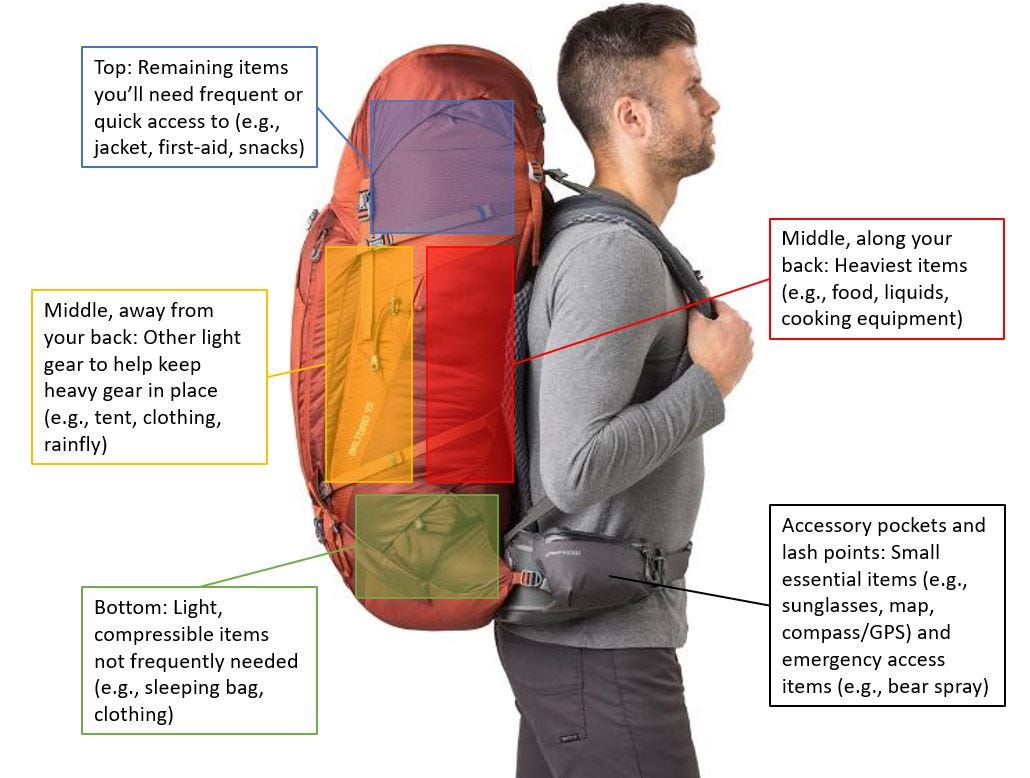
Start by sewing the side panels to the back panel. Attach the bottom piece next. Then sew the front panel to the sides and bottom.
Attach the straps and handles last. Make sure all seams are strong. Check the bag for any loose threads or weak spots.
- Sew side panels to back panel
- Attach bottom piece
- Join front panel to sides and bottom
- Sew straps and handles securely
- Inspect and trim loose threads
Credit: pangolinswithpacks.com
Adding Finishing Touches
Making your own backpack is rewarding. The final touches make it strong and stylish.
Focus on straps, closures, and personal style to complete your backpack.
Attaching Straps And Handles
Straps and handles let you carry the backpack comfortably. Use strong stitching to hold them in place.
- Cut straps to the right length for your use.
- Use reinforced fabric or webbing for durability.
- Sew straps onto the backpack with double stitching.
- Add padding for extra comfort on shoulder straps.
- Attach handles securely at the top for easy grabbing.
Securing Zippers And Closures
Zippers and closures keep your items safe. Make sure they are strong and easy to use.
| Closure Type | Tips for Attachment |
| Zipper | Sew slowly to avoid jamming. Use zipper stops. |
| Velcro | Use heavy-duty Velcro strips. Sew edges well. |
| Snap Buttons | Use a snap button tool. Place on reinforced fabric. |
| Buckles | Attach with strong webbing. Check for secure fastening. |
Personalizing Your Backpack
Make your backpack unique by adding personal touches. Choose colors, patches, or decorations you like.
Try these ideas to personalize your backpack:
- Sew on patches or badges.
- Use fabric paint to add designs.
- Add keychains or zipper pulls.
- Attach small pockets or loops.
- Use embroidery for names or patterns.
Credit: www.customink.com
Frequently Asked Questions
What Materials Do I Need To Make A Backpack?
You need fabric, thread, zippers, straps, and a sewing machine or needle.
How Long Does It Take To Sew A Backpack?
It usually takes 3 to 5 hours, depending on your skill level.
Can I Customize The Size Of My Backpack?
Yes, you can change the pattern to make any size you want.
What Tools Are Essential For Making A Backpack?
A sewing machine, scissors, pins, measuring tape, and a ruler are key tools.
How Do I Add Pockets To My Homemade Backpack?
Cut fabric pieces, sew them onto the main body before assembling the backpack.
Is It Cheaper To Make My Own Backpack?
Often yes, especially if you use leftover materials or buy fabric in bulk.
Conclusion
Making your own backpack can be fun and rewarding. You choose the size, color, and pockets you want. It saves money and lets you carry things your way. Start with simple steps and take your time. Practice makes better, so don’t worry about mistakes.
Each backpack you make will teach you something new. Enjoy the process and show off your creation proudly. Crafting your own bag means it fits just right. Why buy when you can build your perfect backpack?