Last Updated on July 4, 2026 by Eric B. Steele
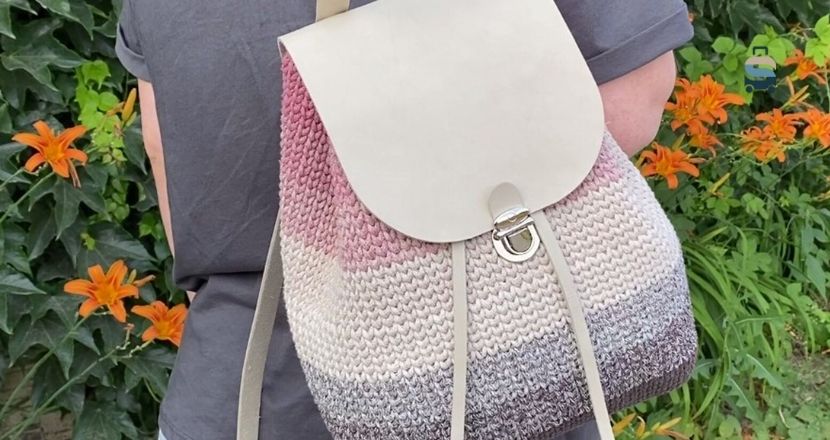
Are you ready to create a stylish and practical backpack with your own hands? Crocheting a backpack might sound tricky, but with the right steps, you can make one that’s unique and perfect for your style.
Imagine carrying something you made yourself—something that stands out and fits your needs perfectly. You’ll discover simple, clear instructions that guide you through every stitch. By the end, you’ll not only have a cool backpack but also the pride of crafting it all by yourself.
Keep reading, and let’s turn yarn into your next favorite accessory!

Materials Needed
To crochet a backpack, you need the right materials. These materials help you create a strong and beautiful bag.
This guide covers the yarn, crochet hooks, and other supplies you should have.
Choosing Yarn
Yarn is the main material for your backpack. Pick yarn that is strong and easy to clean.
Look for yarn types that hold their shape well and resist wear and tear.
- Cotton yarn is durable and smooth
- Acrylic yarn is affordable and washable
- Blended yarns combine strength and softness
- Choose a medium or bulky weight for sturdiness
Selecting Crochet Hooks
The crochet hook size must match your yarn. Using the right hook makes stitching easier.
Hooks come in different materials and sizes. Pick one that feels comfortable in your hand.
- Use a hook size suggested on your yarn label
- Metal hooks are smooth and fast
- Wood hooks feel warm and reduce hand strain
- Plastic hooks are lightweight and affordable
Additional Supplies
You need some extra tools to finish your backpack neatly. These help with assembly and decoration.
Gather these items before starting to crochet your backpack.
- Scissors for cutting yarn
- Yarn needle for sewing parts together
- Stitch markers to keep track of your stitches
- Measuring tape to check size
- Zippers, buttons, or straps for closures and comfort
Basic Crochet Stitches
Crocheting a backpack can be fun and creative. Knowing basic stitches is key. They are simple to learn and form the foundation for your backpack project.
This guide will cover the essential stitches. Once you understand these, you’ll be ready to crochet your own backpack.
Chain Stitch
The chain stitch is the starting point for most crochet projects. It forms the base row that other stitches build on.
To create a chain stitch, follow these steps:
- Make a slip knot on your hook.
- Yarn over and pull through the loop on the hook.
- Repeat until you have the desired length.
Single Crochet
The single crochet stitch is tight and dense. It is great for making sturdy projects like bags.
- Insert the hook into the second chain from the hook.
- Yarn over and pull up a loop.
- Yarn over again and pull through both loops on the hook.
- Continue to the end of the row.
Double Crochet
The double crochet stitch is taller than the single crochet. It creates a looser and more flexible fabric.
| Stitch Type | Height | Texture |
| Single Crochet | Short | Dense |
| Double Crochet | Tall | Loose |
To make a double crochet, follow these steps:
- Yarn over, then insert the hook into the stitch.
- Yarn over again and pull through the stitch.
- Yarn over, pull through two loops.
- Yarn over, pull through the remaining two loops.

Crocheting The Backpack Body
Crocheting the body of a backpack is a fun and rewarding project. This guide covers the key parts of the process. You will learn how to start the base, build the sides, and shape the top.
Using simple stitches and patterns will help you create a sturdy and attractive backpack. Let’s begin with the foundation.
Starting The Base
The base of the backpack holds everything together. It should be strong and flat. Begin by chaining the length you want for the base.
- Chain the desired number of stitches for the base width.
- Work single crochet stitches into each chain for firmness.
- Turn your work at the end of each row.
- Continue until the base reaches the needed length.
Building The Sides
After the base is ready, you will build the sides by crocheting upwards. This part shapes the backpack’s walls.
| Row | Stitch Type | Description |
| 1 | Single Crochet | Attach yarn and crochet around the base edges. |
| 2-10 | Half Double Crochet | Build height evenly with half double crochet stitches. |
| 11 | Slip Stitch | Finish the side and prepare for the top shaping. |
Shaping The Top
The top of the backpack can be rounded or flat. Use decreases to shape the top nicely and close the opening.
- Work two stitches together to decrease width evenly.
- Repeat decreases on all sides until the top is the desired size.
- Finish with a row of single crochet to secure the shape.
- Add a flap or zipper as needed for closure.
Adding Straps And Finishing Touches
Adding straps and finishing touches gives your crocheted backpack its final look. Straps make it easy to carry. Finishing touches add style and function.
This part is important for comfort and durability. Let’s explore how to make adjustable straps, attach them, and add pockets and closures.
Making Adjustable Straps
Adjustable straps let you change the length of the backpack straps. This helps fit different body sizes. Use simple stitches to crochet long straps.
Add buttonholes or loops at regular intervals. Use buttons, buckles, or rings to secure the strap length. This makes the backpack more comfortable to wear.
- Crochet a strap as long as needed
- Make buttonholes by skipping stitches
- Attach buttons or buckles for length change
- Use sturdy yarn for strength
Attaching Straps
Attach the straps securely to the backpack body. Use a strong stitch like slip stitch or single crochet. Attach straps evenly for balance.
Reinforce the ends by sewing extra rows or knots. Check that straps hold weight without stretching or slipping. This keeps the backpack safe to carry.
- Pin straps to backpack at equal distances
- Crochet or sew straps firmly in place
- Reinforce strap ends with extra stitches
- Test strap strength before use
Adding Pockets And Closures
Pockets add space for small items and help organize. Crochet separate pocket pieces and sew them on. Use matching yarn for a neat look.
Closures keep the backpack closed and secure. Common choices are buttons, zippers, or drawstrings. Choose what fits your style and skill level.
- Crochet pocket panels in desired size
- Sew pockets on front or inside
- Add buttons or snaps for pocket closure
- Use zipper or drawstring for main bag
Frequently Asked Questions
What Materials Do I Need To Crochet A Backpack?
You need yarn, a crochet hook, scissors, a yarn needle, and stitch markers.
How Long Does It Take To Crochet A Backpack?
It usually takes about 6 to 10 hours depending on skill and design.
Can Beginners Crochet A Backpack Easily?
Yes, beginners can crochet a backpack by following simple patterns step-by-step.
What Crochet Stitches Are Best For Backpacks?
Single crochet and double crochet stitches work well for sturdy backpacks.
How Do I Make Backpack Straps With Crochet?
Crochet long, flat strips using single crochet stitches for strong, comfortable straps.
Can I Wash A Crocheted Backpack Safely?
Yes, hand wash with mild soap and air dry to keep shape intact.
Conclusion
Crocheting a backpack can be fun and useful. You only need basic crochet skills and patience. Choose yarn and colors you like to make it personal. Follow steps carefully to create a strong, stylish bag. Practice helps you improve each time you crochet.
Soon, you will enjoy carrying your own handmade backpack. Give it a try and see the results yourself!